I'm not going to go into a super detailed description... you can read the tutorials and I'm sure they explain the basic construction better than I can.
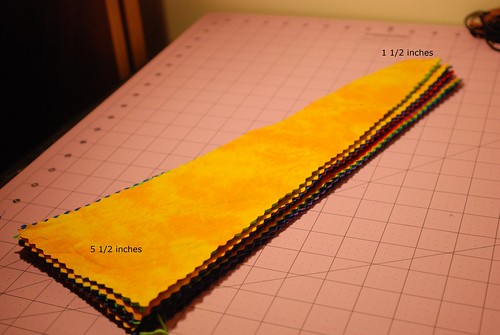
This is how I figured out what size to cut the strips.
Isabelle's waist measurement was 22 inches, add 2 inches according to the circle skirt tutorial, so we have 24. I had 5 different fabrics, so I decided to round it up to 25 inches for simplicity's sake. So, 5 inches per color to work with. I decided, again, to take the simple route and do 5 strips per color. 5 x 5 = 25. Easy. The waist end of the strip needed to be 1" plus seam allowances, so 1.5".
I used the same formula to figure out the bottom of the skirt so I'd know how wide the bottom of my strips should be. I rounded my measurement up to 125". Sounds huge, right? We have 25 strips, so 125/25 = 5. The bottom of my strips need to be 5" plus seam allowances, so 5.5".
Two notes here... I forgot to cut the fat quarters to the length I used to figure out my outer circumference ( a fat quarter is 18" tall and I was shooting for 16"). It wasn't a big enough difference to be an issue, and even if it were a bigger difference, it just wouldn't be a flat circle when I was finished. Secondly, don't panic if you slip up and cut a strip half an inch too narrow or something like that. You have a little room for error with this kind of skirt. I am telling you from experience.
You see my gorgeous pinked edges? Lookie at my new toy...
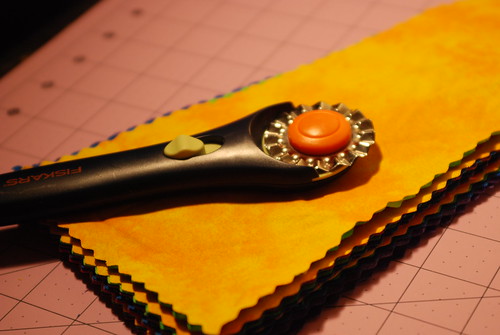
Well, the just the blade... I've had the rotary cutter for a while
When I realized I'd have 25 strips and that the serger fairy had yet to visit me, I decided I needed an easier way to finish my seams than zigzagging the edges. Going over the same seam twice was going to make me crazy. I knew I had seen pinking blades before, so I went in search of one and found one. I also grabbed some pinking shears. We're going to be great friends, I just know it.
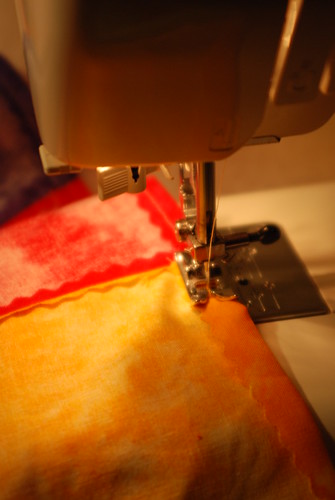
I sewed all the strips together, then pressed all 25 seams open and got ready to hem. Did you notice I pinked the bottom, also? Because I knew I'd do this:
Oooh, cheater!
I was concerned about the hem being all wonky since it's a circle, so I just folded it over half an inch and left it at that. I was afraid if I folded it over again, it would be all puckered and funky.
I am not crazy about the elastic I got... I am sure next time I can find something better. I bent probably half a dozen pins trying to pin the skirt to it... it's really stiff.
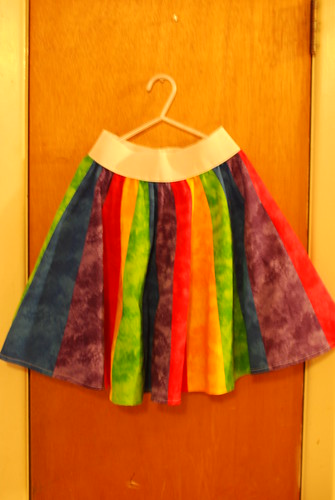
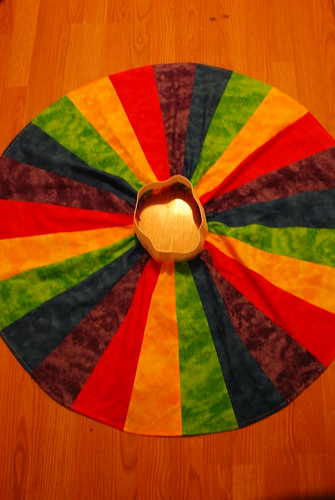
Here is the finished skirt:
You want to see it spread out?
Ooooh... ahhhhh.... Oh, you want to see it on Miss Iz?
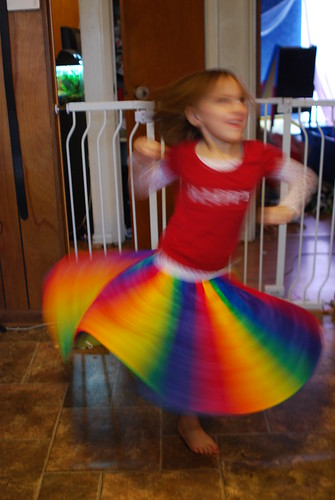
I love how the colors blend in the picture...
I love how the colors blend in the picture...
Yeah, I know she's blurry, but I just love the look on her face. The skirt was definitely a success. She and Olivia traded it back and forth all weekend long. I managed to get it off of their bodies to put it in the wash and Isabelle immediately pulled it out to wear to school in the morning.
Two things... somehow the elastic is too big and it rides her hips. I'm kind of hoping it just stretched while I was sewing and will shrink back up now that I've washed it. We'll just see. Not that big of a deal... it doesn't fall off and she'll be able to wear it longer. The second thing is the length. I didn't mean it to be that long. See, what happened was that when I had to figure out the outer circumference, I had to use the radius from the center of the circle, which was 15" (the 16" above included the allowance for the waistband and the hem) Thing is.... 15" is the length I was going for (11") plus the 4" for the waist. My bad. She likes it and that's all that matters.
I made another circle skirt tonight. It's black with pink polka-dots. Correct length. With a different type of elastic. The rainbow skirt used woven elastic, and this one knit elastic. I'll definitely be using knit from now on. And you know what's super cool about circle skirts? No seams. Not one (unless you don't have enough fabric to cut the entire circle, then you might have to piece it together). I didn't even hem it, just zigzagged the raw edge (in pink) (it took forever... that's 125" of fabric to zigzag). Aside from the endless zigzagging, it took like 15 minutes. Best skirt technique ever.
Anyway, we'll see which one she actually wears to school. Maybe Zoe will wear it. Who knows with them?
What an adorable look on her face! That is a very cute skirt! You'll have to post pictures of the black and pink one too.
ReplyDeletethis is awesome! thanks for sharing!
ReplyDeletethis is awesome! thanks for sharing!
ReplyDelete